简介
搭建环境:ubuntu 16.04, cudnn v7, CUDA 9.0
caffe库安装
文件
安装在标准caffe库上进行修改的segNet的caffe库文件(其caffe库的连接: github连接),一般对Makefile和Makefile.config文件的修改参考CSDN博客( 连接1 , 连接2 ),能满足大多数系统修改,出现问题一般可自行谷歌或百度到。
安装过程所有报错问题及解决方案:
问题1
问题描述: 出现 make: *** [.build_release/src/caffe/internal_thread.o] Error 1 错误,并在报错信息包含以下报错信息:
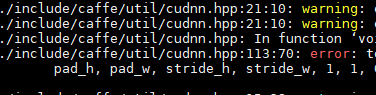
出现以上问题是cudnn版本不对应,需要对caffe库中cudnn.hpp进行修改。
解决方案:从BLV/caffe 下载标准caffe库,将标准caffe库中的 ./include/caffe/utils/cudnn.hpp 拷贝到对应编译库位置中。
问题2
问题描述: 出现 collect2: error: ld returned 1 exit status
Makefile:620: recipe for target ‘.build_release/tools/convert_imageset.bin’ failed
make: *** [.build_release/tools/convert_imageset.bin] Error 1
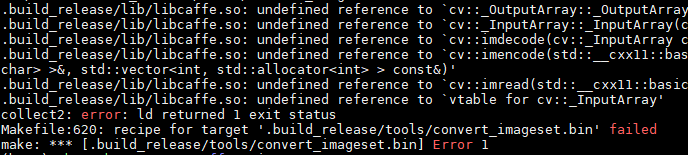
看起来是opencv的问题
解决方案: 将Makefile.config中USE_OPENCV:=1 改为 USE_OPENCV:=0。
问题3
问题描述: /home/zhangchao/anaconda3/lib/libopencv_imgcodecs.so: undefined reference to `jpeg_stdio_dest@LIBJPEG_9.0’
collect2: error: ld returned 1 exit status
Makefile:620: recipe for target ‘.build_release/tools/convert_imageset.bin’ failed
make: *** [.build_release/tools/convert_imageset.bin] Error 1

问题解决方案: 在Makefile.config中OPENCV_VERSION:=3注释掉。
问题4
问题描述: Makefile:576: recipe for target ‘.build_release/src/caffe/layers/dense_image_data_layer.o’ failed
make: *** [.build_release/src/caffe/layers/dense_image_data_layer.o] Error 1

看起来是dense_image _data_layer.cpp导致出现问题
解决方案: 原始中caffe库文件中没有此文件,因为我主要使用这个库中的bn.layer,故我将dense_image _data_layer.cpp删除。
问题5
问题描述: Makefile:576: recipe for target ‘.build_release/src/caffe/data_transformer.o’ failed
make: * [.build_release/src/caffe/data_transformer.o] Error 1
make: * Waiting for unfinished jobs….

解决方案: 从BLV/caffe 下载标准caffe库,将标准caffe库中的 ./src/caffe/data_transformer.cpp 拷贝到对应编译库位置中。
问题6
问题描述: test_segmentation.cpp:(.text.startup+0x1a2): undefined reference to `cv::imread(std::__cxx11::basic_string<char, std::char_traits
collect2: error: ld returned 1 exit status
Makefile:625: recipe for target ‘.build_release/examples/SegNet_with_C++/test_segmentation.bin’ failed
make: *** [.build_release/examples/SegNet_with_C++/test_segmentation.bin] Error 1

解决方案: 原始中caffe库文件中没有SegNet_with_C++文件夹,因为我主要使用这个库中的bn.layer,故我将SegNet_with_C++文件夹删除。
问题7
问题描述: make runtest 过程中出现 .build_release/tools/caffe
.build_release/tools/caffe: error while loading shared libraries: libhdf5_hl.so.100: cannot open shared object file: No such file or directory
Makefile:527: recipe for target ‘runtest’ failed
make: *** [runtest] Error 127

解决方案: locate libhdf5_hl.so.100,找到文件路径,使用export LD_LIBRARY_PATH=&{ANACONDA_HOME}/pkgs/*/lib/:$LD_LIBRARY_PATH,将其加入到环境变量中。
问题8
问题描述:

问题解决方案: 将Makefile中USE_OPENCV :=0 改为USE_OPENCV :=1, 解决方案中让给LIBARIES加 opencv_imgcodecs 的一般都是opencv版本没有选择正确
PS:最终编译成功过程是将Amulet中caffe文件全部拷贝到BLV/caffe库中进行编译成功的,用修改后的caffe库的给出的github文件一般都会有对应caffe文件,拷贝过去编译即可
问题9
问题描述: make test -j48出现部分测试没有通过
问题解决方案:在前面将环境变量加入,CUDA_VISIBLE_DEVICES=gpu_id make test -j48
编译matcaffe和pycaffe
matcaffe编译
将 MATLAB_DIR 前面注释去掉,将路径改为自己matlab的路径,如下图:
 ))
))
再使用 make matcaffe -j16
pycaffe编译
因为进行caffe编译的HDF5文件是使用的/usr/../../目录下的,所以使用编译的python也须是安装根目录下的,不能使用anaconda目录下的python路径(选择OPENCV_VERSION也会一样的,只看根目录下的)。不然就会各种报错……心累。最后将caffe中python文件夹路径加入到~/.bascrc文件中, export=~/caffe/python